


Reduce your app size
Users often avoid downloading apps that seem too large, particularly in emerging markets where devices connect to often-spotty 2G and 3G networks or work on pay-by-the-byte plans. This page describes how to reduce your app's download size, which enables more users to download your app.
Upload your app with Android App Bundles
The easiest way to gain immediate app size savings when publishing to Google Play is by uploading your app as an Android App Bundle, which is a new upload format that includes all your app’s compiled code and resources, but defers APK generation and signing to Google Play.
Google Play’s new app serving model then uses your app bundle to generate and serve optimized APKs for each user’s device configuration, so they download only the code and resources they need to run your app. You no longer have to build, sign, and manage multiple APKs to support different devices, and users get smaller, more optimized downloads.
Keep in mind, because Google Play enforces a compressed download size restriction of 150 MB or less for apps published with app bundles, it's still a good idea to apply the guidelines described on this to reduce your app's download size as much as possible.
For apps you publish to Google Play by uploading signed APKs, compressed downloads are restricted to 100 MB or less.
Use the Android Size Analyzer
The Android Size Analyzer tool is an easy way to identify and implement many strategies for reducing the size of your app. It is available as both an Android Studio plugin as well as a standalone JAR.
Use the analyzer in Android Studio
You can download the Android Size Analyzer plugin using the plugin marketplace in Android Studio, as shown in figure 1. To open the plugin marketplace and install the plugin, proceed as follows:
- Select File > Settings (or on Mac, Android Studio > Preferences.)
- Select the Plugins section in the left panel.
- Click the Marketplace tab.
- Search for the "Android Size Analyzer" plugin.
- Click the Install button for the analyzer plugin.
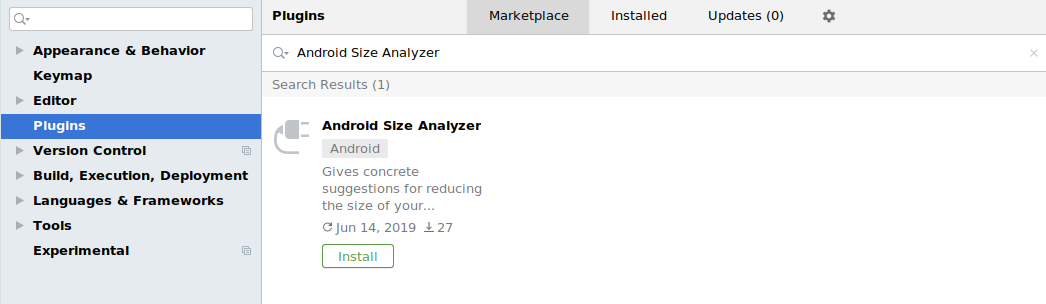
Figure 1. The Android Size Analyzer plugin in the Marketplace tab.
After you install the plugin, run a app size analysis on your current project by selecting Analyze > Analyze App Size from the menu bar. After analyzing your project, a tool window appears with recommendations on how to reduce the size of your app, as shown in figure 2.
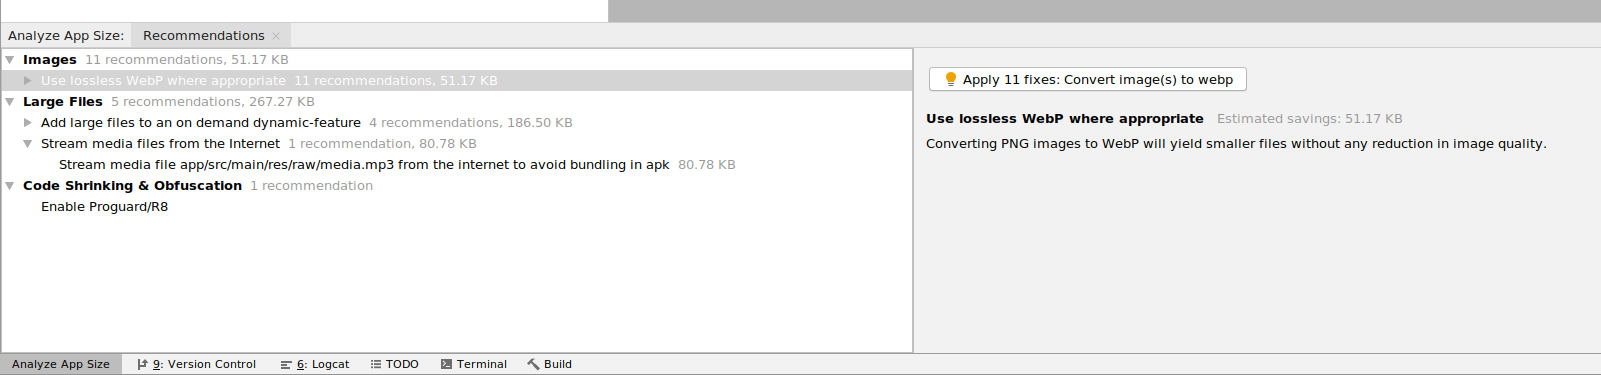
Figure 2. The Android Size Analyzer plugin tool window with recommendations.
Use the analyzer from the command line
You can download the latest version of the Android Size Analyzer, either as a TAR or ZIP file, from GitHub. After extracting the archive, run the size-analyzer script (on Linux or MacOS) or the size-analyzer.bat script (on Windows) on your Android project or Android App Bundle using one of the following commands:
Understand the APK structure
Before discussing how to reduce the size of your app, it's helpful to understand the structure of an app's APK. An APK file consists of a ZIP archive that contains all the files that comprise your app. These files include Java class files, resource files, and a file containing compiled resources.
An APK contains the following directories:
META-INF/: Contains theCERT.SFandCERT.RSAsignature files, as well as theMANIFEST.MFmanifest file.assets/: Contains the app's assets, which the app can retrieve using anAssetManagerobject.res/: Contains resources that aren't compiled intoresources.arsc.lib/: Contains the compiled code that is specific to the software layer of a processor. This directory contains a subdirectory for each platform type, likearmeabi,armeabi-v7a,arm64-v8a,x86,x86_64, andmips.
An APK also contains the following files. Among them, only AndroidManifest.xml is mandatory.
resources.arsc: Contains compiled resources. This file contains the XML content from all configurations of theres/values/folder. The packaging tool extracts this XML content, compiles it to binary form, and archives the content. This content includes language strings and styles, as well as paths to content that is not included directly in theresources.arscfile, such as layout files and images.classes.dex: Contains the classes compiled in the DEX file format understood by the Dalvik/ART virtual machine.AndroidManifest.xml: Contains the core Android manifest file. This file lists the name, version, access rights, and referenced library files of the app. The file uses Android's binary XML format.
Reduce resource count and size
The size of your APK has an impact on how fast your app loads, how much memory it uses, and how much power it consumes. One of the simple ways to make your APK smaller is to reduce the number and size of the resources it contains. In particular, you can remove resources that your app no longer uses, and you can use scalable Drawable objects in place of image files. This section discusses these methods as well as several other ways that you can reduce the resources in your app to decrease the overall size of your APK.
Remove unused resources
The lint tool, a static code analyzer included in Android Studio, detects resources in your res/ folder that your code doesn't reference. When the lint tool discovers a potentially unused resource in your project, it prints a message like the following example.
Note: The lint tool doesn't scan the assets/ folder, assets that are referenced via reflection, or library files that you've linked to your app. Also, it doesn't remove resources; it only alerts you to their presence.
Libraries that you add to your code may include unused resources. Gradle can automatically remove resources on your behalf if you enable shrinkResources in your app's build.gradle file.
To use shrinkResources, you must also enable code shrinking. During the build process, R8 first removes unused code. Then, the Android Gradle plugin removes the unused resources.
For more information about code and resource shrinking, and other ways Android Studio helps you reduce APK size, see Shrink, obfuscate, and optimize your app.
In Android Gradle Plugin 0.7 and higher, you can declare the configurations that your app supports. Gradle passes this information to the build system using the resConfig and resConfigs flavors and the defaultConfig option. The build system then prevents resources from other, unsupported configurations from appearing in the APK, reducing the APK's size. For more information about this feature, see Remove unused alternative resources.
Minimize resource use from libraries
When developing an Android app, you usually use external libraries to improve your app's usability and versatility. For example, you might reference the Android Support Library to improve the user experience on older devices, or you could use Google Play Services to retrieve automatic translations for text within your app.
If a library was designed for a server or desktop, it can include many objects and methods that your app doesn’t need. To include only the parts of the library that your app needs, you can edit the library's files if the license allows you to modify the library. You can also use an alternative, mobile-friendly library to add specific functionality to your app.
Note: code shrinking can clean up some of a library's unnecessary code, but it might not be able to remove some large internal dependencies.
Support only specific densities
Android supports a very large set of devices, encompassing a variety of screen densities. In Android 4.4 (API level 19) and higher, the framework supports various densities: ldpi, mdpi, tvdpi, hdpi, xhdpi, xxhdpi and xxxhdpi. Although Android supports all these densities, you don't need to export your rasterized assets to each density.
If you know that only a small percentage of your users have devices with specific densities, consider whether you need to bundle those densities into your app. If you don't include resources for a specific screen density, Android automatically scales existing resources originally designed for other screen densities.
If your app needs only scaled images, you can save even more space by having a single variant of an image in drawable-nodpi/. We recommend that every app include at least an xxhdpi image variant.
For more information screen densities, see Screen Sizes and Densities.
Use drawable objects
Some images don't require a static image resource; the framework can dynamically draw the image at runtime instead. Drawable objects (<shape> in XML) can take up a tiny amount of space in your APK. In addition, XML Drawable objects produce monochromatic images compliant with material design guidelines.
Reuse resources
You can include a separate resource for variations of an image, such as tinted, shaded, or rotated versions of the same image. We recommend, however, that you reuse the same set of resources, customizing them as needed at runtime.
Android provides several utilities to change the color of an asset, either using the android:tint and tintMode attributes on Android 5.0 (API level 21) and higher. For lower versions of the platform, use the ColorFilter class.
You can also omit resources that are only a rotated equivalent of another resource. The following code snippet provides an example of turning a "thumb up" into a "thumb down" by pivoting at the middle of the image and rotating it 180 degrees:
Render from code
You can also reduce your APK size by procedurally rendering your images. Procedural rendering frees up space because you no longer store an image file in your APK.
Crunch PNG files
The aapt tool can optimize the image resources placed in res/drawable/ with lossless compression during the build process. For example, the aapt tool can convert a true-color PNG that does not require more than 256 colors to an 8-bit PNG with a color palette. Doing so results in an image of equal quality but a smaller memory footprint.
Keep in mind that the aapt has the following limitations:
- The
aapttool does not shrink PNG files contained in theasset/folder. - Image files need to use 256 or fewer colors for the
aapttool to optimize them. - The
aapttool may inflate PNG files that have already been compressed. To prevent this, you can use theisCrunchPngsflag to disable this process for PNG files:
Compress PNG and JPEG files
You can reduce PNG file sizes without losing image quality using tools like pngcrush, pngquant, or zopflipng. All of these tools can reduce PNG file size while preserving the perceptive image quality.
The pngcrush tool is particularly effective: This tool iterates over PNG filters and zlib (Deflate) parameters, using each combination of filters and parameters to compress the image. It then chooses the configuration that yields the smallest compressed output.
To compress JPEG files, you can use tools like packJPG and guetzli.
Use WebP file format
Instead of using PNG or JPEG files, you can also use the WebP file format for your images, when targeting Android 3.2 (API level 13) and higher. The WebP format provides lossy compression (like JPEG) as well as transparency (like PNG) but can provide better compression than either JPEG or PNG.
You can convert existing BMP, JPG, PNG or static GIF images to WebP format using Android Studio. For more information, see Create WebP Images Using Android Studio.
Use vector graphics
You can use vector graphics to create resolution-independent icons and other scalable media. Using these graphics can greatly reduce your APK footprint. Vector images are represented in Android as VectorDrawable objects. With a VectorDrawable object, a 100-byte file can generate a sharp image the size of the screen.
However, it takes a significant amount of time for the system to render each VectorDrawable object, and larger images take even longer to appear on the screen. Therefore, consider using these vector graphics only when displaying small images.
For more information on working with VectorDrawable objects, see Working with Drawables.
Use vector graphics for animated images
Do not use AnimationDrawable to create frame-by-frame animations because doing so requires that you include a separate bitmap file for each frame of the animation, which drastically increase the size of your APK.
Instead, you should use AnimatedVectorDrawableCompat to create animated vector drawables.
Reduce native and Java code
There are several methods you can use to reduce the size of the Java and native codebase in your app.
Remove unnecessary generated code
Make sure to understand the footprint of any code which is automatically generated. For example, many protocol buffer tools generate an excessive number of methods and classes, which can double or triple the size of your app.
Avoid enumerations
A single enum can add about 1.0 to 1.4 KB of size to your app's classes.dex file. These additions can quickly accumulate for complex systems or shared libraries. If possible, consider using the @IntDef annotation and code shrinking to strip enumerations out and convert them to integers. This type conversion preserves all of the type safety benefits of enums.
Reduce the size of native binaries
If your app uses native code and the Android NDK, you can also reduce the size of the release version of your app by optimizing your code. Two useful techniques are removing debug symbols and not extracting native libraries.
Remove debug symbols
Using debug symbols makes sense if your application is in development and still requires debugging. Use the arm-eabi-strip tool, provided in the Android NDK, to remove unnecessary debug symbols from native libraries. After that, you can compile your release build.
Avoid extracting native libraries
When building the release version of your app, package uncompressed .so files in the APK by setting android:extractNativeLibs="false" in the <application> element of your app's manifest. Disabling this flag prevents PackageManager from copying .so files from the APK to the filesystem during installation and has the added benefit of making updates of your app smaller. When building your app using Android Gradle plugin 3.6.0 or higher, the plugin sets this property to "false" by default.
Maintain multiple lean APKs
Your APK might contain content that users download but never use, like additional language or per-screen-density resources. To ensure a minimal download for your users, you should upload your app to Google Play using Android App Bundles. Uploading app bundles let's Google Play generate and serve optimized APKs for each user’s device configuration, so they download only the code and resources they need to run your app. You no longer have to build, sign, and manage multiple APKs to support different devices, and users get smaller, more optimized downloads.
If you're not publishing your app to Google Play, you can segment your app into several APKs, differentiated by factors such as screen size or GPU texture support.
When a user downloads your app, their device receives the correct APK based on the device's features and settings. This way, devices don't receive assets for features that the devices don't have. For example, if a user has a hdpi device, they don’t need xxxhdpi resources that you might include for devices with higher density displays.
For more information, see Configure APK Splits and Maintaining Multiple APKs